UTORvpn Instructions
UTORvpn Instructions
- Dan Hill (Unlicensed)
- Martin Hermans
- Law IT HelpDesk (Unlicensed)
- Bobby Nguyen
Owned by Dan Hill (Unlicensed)
Last updated: Feb 25, 2022 by Martin Hermans
Installing UTORvpn on Windows 7/8/10
The Cisco AnyConnect Client must be installed before using UTORvpn on windows.
- Download the Windows Client file from https://isops.noc.utoronto.ca/download/. You must have a valid UTORid and be eligible for the service.
- Run the installer file, and accept the licence agreement.
- You will need to be an administrator on your computer to finish installing the client. If you are on a managed workstation, contact your IT support to have them deploy the AnyConnect client.
Start the AnyConnect and connect to UTORvpn.
Installing UTORvpn on Mac
The Cisco AnyConnect Client must be installed before using UTORvpn on OS X.
- Download the OS X Client file from https://isops.noc.utoronto.ca/download/. You must have a valid UTORid and be eligible for the service.
- Open the .dmg file, an administrator on your computer to do this.
- Double click on AnyConnect.pkg to start the installer.
- Click Continue and accept the Licence.
Uncheck all modules except VPN. Click Continue.
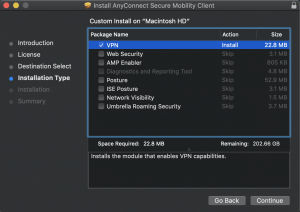
- Complete the Install.

Start the AnyConnect and connect to UTORvpn.
Getting Connected
- Open the AnyConnect Client.
- Enter or select “general.vpn.utoronto.ca” and click “Connect”.
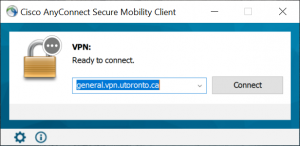
- An authentication window will open for the group “utorvpn”. Enter your UTORid and Password. Click “OK”.

- Your computer will now notify you that it is connected to the VPN.


Disconnecting
- Open the AnyConnect Client
- Click “Disconnect”


Related articles
, multiple selections available, Use left or right arrow keys to navigate selected items